
You've probably seen many Top 10 lists. We have taken our own spin on the ever-popular "Top-10" list as it relates to Rigid Scope Care. Rigid scopes are particularly difficult for sterile processing technicians due to the visual component, fragility, high cost, and ease with which scopes can become damaged. Continue reading to learn more about common Rigid Scope Hazards and how employees can help prevent them!
1. Dystal damage not seen
During a surgical procedure, the distal end of the scope may come into contact with other surgical devices such as shavers, lasers, and cautery devices, which can burn, scratch, chip, or damage the distal end glass and/or the metal outer tube and light fibers at the scope's tip.

Danger: Damaged glass can become loose or enter the patient causing poor recovery or repeat surgical procedure. Sharp edges or burs on the scope can cause tissue trauma to the patient. Fibers can become damaged or recessed, resulting in light loss and a cavity for bioburden that can make sterilization ineffective.
Prevention: Specifically check the distal end including the window, sealant/solder seal, fibers and around the entire distal end for trauma, under magnification, after every procedure and before sterilization. Any scopes with distal damage should be removed from service and repaired.
2. Poor cleaning of the dystal glass
The dystal glass is subject to bioburden, chemical surfactants, and hard water deposits that can leave residue or build up on the lens. Inadequate cleaning coupled with subsequent use and sterilization can cause the build up to become worse over time.

Danger: Residue on the distal window will create poor optical quality and cross-contamination risks. (Remember, if it is not clean, it cannot be sterile.)
Prevention: Clean and polish the distal window on a daily basis. You can use a manufacture provided polishing paste (be careful to rinse and remove), a water-based cleaning agent, or non-abrasive cloth after cleaning and before sterilization. Our favorite tool is a simple pencil eraser. Carefully “erase” the window to remove stubborn build up followed by an Acetone or Alcohol wipe. Check under magnification. Repeat if necessary. (You can also clean the eyepiece window using this same technique.)
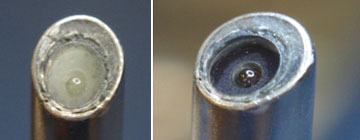
3. Poor inspection of the image
A visual inspection is the most important inspection step to be sure the image is clear and ready for the next surgical procedure. Unfortunately, many technicians have not been properly trained on how to look through the scope to determine if the image is clear.

Prevention: After you’ve checked and cleaned the dystal window, look through the scope. Look down at a white, non-glossy piece of paper with fine print to be sure the entire image is crisp and clear and completely round. Many technicians simply look into space. This does not enable a view of fine image detail, nor simulate the focal distance of the anatomy being viewed during the surgical procedure. When in doubt hook the scope up to a video camera and check the image on a video monitor.
Or make it safe and use LightControl.
4. Wrong transport and storage
It is all too common for scopes to be transported to sterile processing with other instruments placed on top of the scope, or transported with the scope unsecured and rolling around inside the tray.
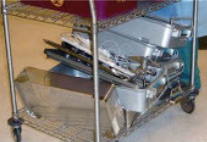
Danger: Increased risk of damage to the equipment and increased repair costs.
Prevention: Separate scopes from other instrumentation during transport and storage, being sure the scope is secured and unable to roll around or fall.
5. Neglecting inspection of internal optics
There is a common overlooked inspection step; the inspection of the internal optical components. When optics inside the scope become chipped, broken, or moisture filled, they can cause visualization problems ranging from a hazy/foggy image to a partial or completely black image.

Danger: Any type of optical damage can degrade the quality of the surgical procedure and increase end-user complaints. Optic damage may also coincide with other scope damage such as a misaligned insertion tube or seal failure that can cause additional problems with usage or safety.
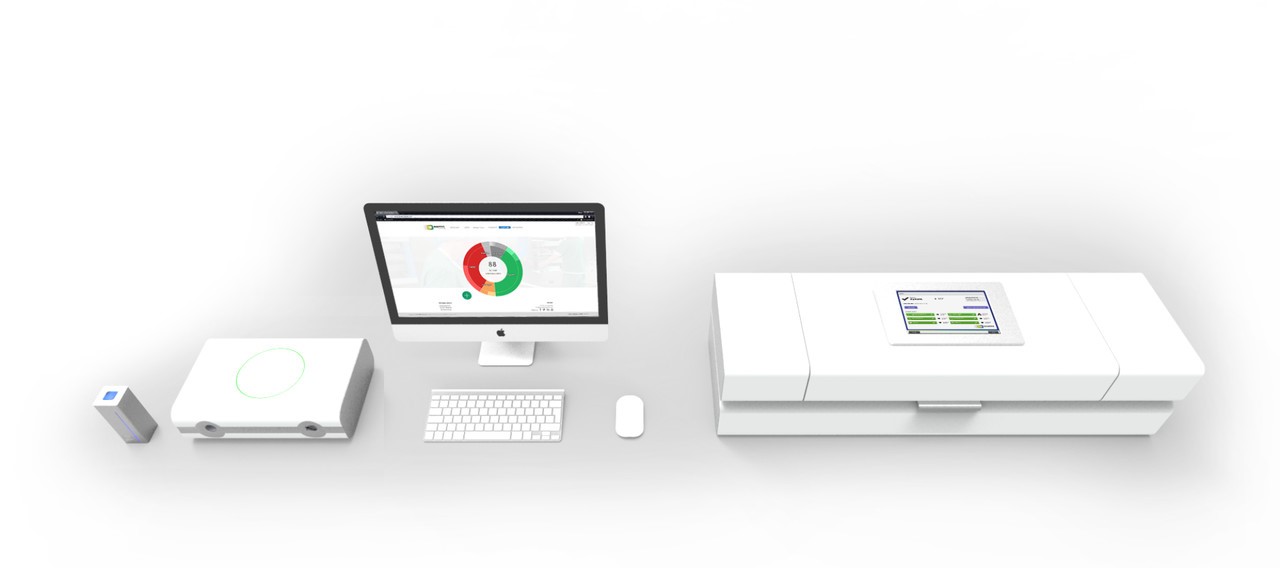
Prevention: Using a magnification loupe or a rigid internal optical scanner such as EndoScan you can look “inside” the optics to examine the lens system and identify defects such as chipped or broken lenses, lens separation, fluid invasion and other defects. Without such a tool it you would not be able to examine the internal lenses. Additionally, it is good for the SPD department to have access to a video monitor or even a wireless camera to duplicate the image on monitor for additional checking.
6. Flash autoclaving
Due to lack of inventory, or because they have been told it is acceptable, many facilities will use Immediate Use Steam Sterilization (IUSS) in order to expedite turnover.
Danger: Flash Autoclaving of scopes on a regular basis (even if approved by the manufacturer) will degrade the life-expectancy of the scope and increase the incidence of scope repairs. The rapid heating and cooling stresses the glass optical components and hermetic seals.
Prevention: Maintain adequate inventory so that flash and routine autoclaving is not required. Using a low-temp sterilization method, although not required, can greatly extend the life-expectancy of your equipment.
7. Pressure on the scope shaft
The glass rod lenses inside the shaft of the scope are very delicate. Any pushing or pulling of the shaft/insertion tube when placing or removing scopes from the sterilization container can crack the lenses inside or bend the scope shaft. Likewise, any pressure, dings or dropping of the scope can also damage the delicate optics.

Danger: Bending the scope in any way can cause costly damage. Also a misaligned shaft can cause image shift or problems with mating instrumentation during the surgical procedure
Prevention: Do not handle the scope by the shaft. Be very careful when placing the scope in the sterilization tray. Avoid pushing or pulling on the scope shaft.
8. Lack of inventory
Have caseloads increased, or new surgeons joined the staff, but additional inventory has not been procured? This is just one indicator that you may not have adequate inventory. Other signs include; always needing loaners, delayed or cancelled cases due to insufficient equipment on hand, frequently having multiple scopes in for repair at a time, or needing to routinely use IUSS (immediate use steam sterilization) in order to turn over equipment quickly to keep up with caseload demands.

Danger: Cancelled or delayed cases and more frequent repairs due to IUSS are common risks. Additionally, rushed staff may cut corners in the inspection and reprocessing of equipment in order to turn over equipment for the next case. This can result in increased risks to patient care and increased stress on the staff and complaints from surgical team.
Prevention: Regularly analyze and assess if you are able to keep up with growing cases or increases in demand. Fortunately, you can often purchase additional scope and instrument inventory at a fraction of the cost of new by utilizing a reputable pre-owned equipment vendor if new equipment isn’t in the budget. If excessive repairs are an issue, in-services and re-addressing proper care and handling with the staff can often result in a decrease in repairs.
9. No checking of the Light Fibres
The light fibers that carry light through the scope are separate from the internal optical lenses. When the scope is “dark” you must be able to determine if the darkness is from poor optics, or damaged light fibers, as either can be the cause of diminished light.

Danger: Poor Light output from broken or damaged light fibers degrade the optical quality of the procedure. Additionally, this may cause the surgical staff to increase the light output on light source which creates additional heat and an increased risk of burns or fire from hot light cords that may touch the patient or a surgical drape.
Prevention: Visually Inspect the light fibers in the scope (and light cords) by holding the light post of the scope up to a standard light bulb and looking at the opposite (distal) end. Excessive broken fibers will be noted by black dots. Be sure to check in both directions also looking for burns, recessed or exposed fibers. Visual inspections of light are pretty subjective so we recommend measuring light efficiency using an EndoLume light meter to calculate light efficiency in the light source, light cord and scopes.
10. Never removing light posts adaptors for Cleaning and Sterilisation
All devices with removable components should be disassembled prior to sterilization. Light post adaptors are no exception. Additionally, any operative scope with an internal channel should be cleaned as instructed.
Danger: Corrosion and bioburden underneath the light post adaptors, or from an inadequately cleaned channel, can pose a cross contamination risk.
Prevention: Remove and place the light post adaptors or other removable accessories in the sterilization container with the scope during sterilization. Have adequate inventory on hand in case adaptors are misplaced. Lastly, never glue on the light post adaptors nor try too hard to remove adaptors that will not come off. If you twist the light post, you can sever the light fibers underneath. Follow the manufacturer IFU for instructions on cleaning scopes with an internal operating channel.
(This blog post was originally found on LinkedIn and was written by Lee Ann Purtell at Capital Medical Resources LLC.)
Risks you’ve noticed in the field but haven’t seen listed here? Add your insights in the comments👇