
In addition, a record must be kept of each and every reuse, including a copy of the functional test.
- Storage
The most imporant step is often forgotten, causing delays and screw ups where it hurts the most: At the table where your patient, anxiously awaits a new endoscope.The involvement of a notified body in these procedures are limited to the reuse of the device, amongst which functional testing.
In short: You are wholly responsible for this process and how you do it exactly. Too many mistakes and you'll find an auditor at your desk to find out what's going on. You bet they have read this piece about Spreadsheet Ninjas as well.
For quality purposes and compliancy, by law, it is obligatory to maintain documentation throughout the entire process. Having this on record can be very helpful if there is ever a situation that requires you to backtrack, whether it be due to improper disinfection or a recall.
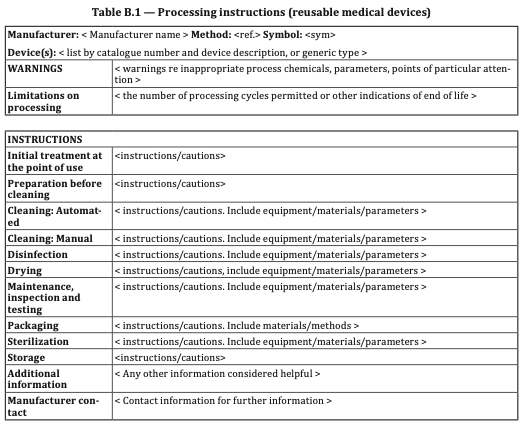
Inspection: Check, verify, document and store
If you can't prove that you checked and tested and something goes wrong, you will be held accountable.
So, check all instruments related to your scope after cleaning for corrosion, damaged surfaces, chips and contamination.
The end of product lifetime is usually determined by wear and damage caused by use. Don't forget that humans cannot see gradual change over time. A machine can.
If damages are found during inspection, send it to your repair company or replace it.
Contaminations of the optics glass surface and mechanic parts might remain even after careful cleaning and disinfection. Still contaminated instruments have to be cleaned and disinfected again.
- Inspection of the mechanics and endoscope can be done with this checklist or by checking the following:
-
0. Overall quality
- The endoscope surfaces have to be undamaged and in particular free of sharp edges.
- Check for dents, bends, mechanical / thermal damage caused by high frequency or laser surgery equipment as well as for cracks and spalling.
-
1. Fibre optics
- Hold the distal endoscope end toward a lighted window or a bright ceiling light. Caution: Do not use a cold-light source for this test. Direct view into the radiated light from a cold light sources can cause eye damage.
-
2. Light guide connector
- - The individual fibres should appear bright
- Move the bright ceiling light facing side slightly up and down
- The brightness of the fibres changes a bit
- It's ok if a couple of individual fibres remain dark. A fracture rate of about 20 to 30% makes endoscopic procedures difficult.
- The surfaces of the light entry and exit surfaces should be smooth and clean. - Rough surfaces with deposits, tangible or withdrawn individual fibres cause insufficient lighting. Further application and processing may result in progressive endoscope damage.
- Endoscopes with damaged fibre optics should be sent in to the manufacturer or an authorized service specialist for checking.
-
3. Proximal and distal areas
- Glass surfaces have to be clean and debris-free. Persistent encrustation should be removed with appropriate cleaning pastes or alcohol-soaked cotton swab or toothpick.
Sloppy rinsing of the optics after cleaning and disinfection is often the cause of precipitates.
-
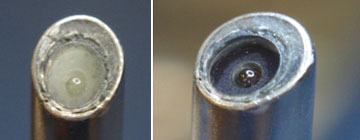
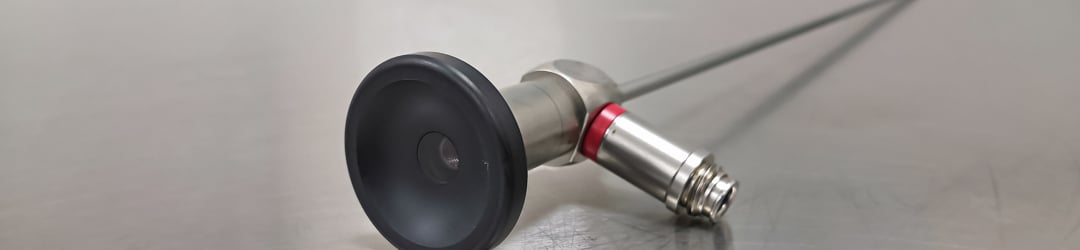
4. Optical inspection
- The image has to be sharp, clear and focused. A fuzzy, non-circular, cloudy, foggy, image pointsto damage. Here are more optical parameters you could check.
- Endoscopes with indelible persistent encrustations should be sent in to the manufacturer or an authorized service specialist for checking.
- Endoscopes with visible chips, impaired image quality or striking surface damage and deformation should not be used. They should be discarded or sent in to the manufacturer or an authorized service specialist for checking.
5. Document
Write, file and store an inspection report, so if there are any questions in the future, you can prove what was checked. A template can be found here.
-
6. Maintenance
- Put the disassembled endoscopes (fibre optic light guide, handles) together again.
- Irrigation stopcocks should not be installed on the endoscope before sterilization.
Don't use Instrument oils before sterilization.
Grease the rinsing taps only after sterilization.
Use sterile fat that has a proven biocompatibility only.
- If processed and checked properly, endoscopes do not require regular maintenance, saving you a ton of money.